I’ve always wanted to write my own tetris clone. I wrote one in javascript. To give it a retro feel, I implemented the game using text graphics.
Table of Contents
I Just Want to Play it!
OK! Click here to play Javascript Text-tris
If you want to learn more about how it was made, keep reading.
Reasons
Why does this exist?
- I have some retro game ideas that I want to implement in javascript, and I needed a simple game project to start with, to learn the basics (pun intended) of implementing a simple game engine in JS.
- I think javascript is an excellent teaching language, and I am planning a follow-up post in order to argue this position.
- I have always wanted to write a Tetris clone.
What is Tetris?
In case you’ve been hiding under a rock for the last 40 years, “tet” is the prefix for four, and a “tetromino” is a 2-dimensional construction of 4 connected squares.
There are exactly 7 unique tetrominoes:

From left to right: Bar, Left-S, Block, Right-S, T, Right-L, Left L
The game of Tetris works as follows:
- Tetrominoes drop from the top of the 10 x 20 game board, and descend one row at a time.
- You can move the pieces right or left, and rotate them.
- Your goal is to complete rows of 10 across, which results in the row being removed.
- If you stack pieces all the way to the top, the game ends.
Like any good game, the rules are incredibly simple, but playing it well requires experience, skill, and planning.
The tall vertical piece is about to drop in to the hole on the left, completing 4 rows.
In the actual Tetris game, as you complete rows, you advance to higher levels, which increases the drop rate, until the pieces are basically free-falling until you mess up a piece, which results in subsequent pieces stacking to the top, and you lose.
Therefore the goal is to play as long as possible, scoring as many points as possible.
Released as a DOS game in 1985, the original Tetris was designed, developed, and released by Alexey Pajitnov. Tetris quickly became a worldwide hit, and was subsequently ported to every conceivable game or computing platform you can think of, and spawning thousands of clones across hundreds of platforms.
In fact, Tetris is still alive and well today, and you can even play it in your browser! (Google for it)
Design Goals
- I’m planning to write an old-school dungeon-crawler in javascript, so part of the project is to get a feel for implementing text-based graphics.
- Replicate the feel of the original. If you have ever played Tetris clones, you know that there are BAD Tetris clones. What makes a clone bad, is how it feels when you play… controls that are too crisp, too laggy, unforgiving game mechanics, uneven piece distribution, and lack of features all contribute.
- DOS was an extremely confined operating environment, and therefore, DOS-based games were normally coded to be extremely efficient. Although efficiency was not the primary goal, it was the overarching theme.
- Implement a fully-functional game engine, which includes a basic game loop:
- Draw the board
- Check for user input
- Update player positions
- Update the game state
- Repeat
- Implement a minimalist, retro interface.
- Everything is parameterized and as modular as possible, so that the game can be tweaked without refactoring code.
Phase I – The Logical Game Board
There are two aspects of the game board. The first is the logical representation, the second is the visual. The logical representation is at the heart of the game, where objects can be placed on the board, and the game logic plays out via the game code. The visual representation is what the player sees at the end of each game cycle when the game board is rendered.
My first thought was an array for the game board. And…this was my first mistake.
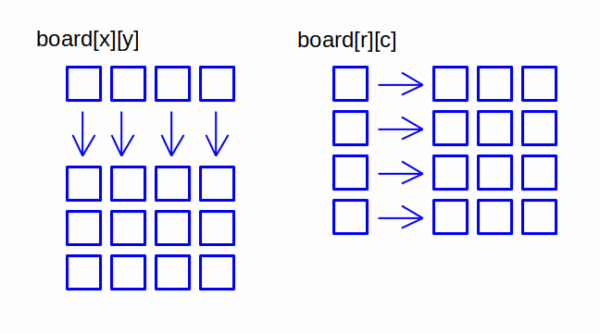
I set up the array as (x,y), but I should have set up the board as (r,c).
In javascript, like C, a 2-dimensional array is actually an array of arrays, where each top-level element is a pointer to an array.
By setting up the board as column-first, I lost a valuable opportunity later, to delete rows by flipping pointers.
In the first (x,y) configuration, removing a row consists of copying each element from the previous row, all the way up to the top.
However, in the second configuration (r,c), each row is a top-level element, and removing a row consists of changing the row’s pointer to point to the previous row’s data.
In the first configuration, as the board is 10 elements wide, so removing each row requires 10 swaps times the row depth. But, in the second configuration, removing each row requires ONE swap (a pointer swap) times the row depth.
So one small design decision at the beginning had rather large implications later.
Column-first code to remove a row:
function removerow(r){
  // * Start at row and copy each element
  // * from the cell above
  for(var rr=r ; rr>1 ; rr-- ){
    var rminus1=rr-1;
    for(var cc=0 ; cc<boardwidth ; cc++){
      board[cc][rr]=board[cc][rminus1];
    }
  }
  // * Generate a blank row
  for(var cc=0 ; cc<boardwidth ; cc++){
    board[cc][0]=BLANKCHAR;
  }
}
Row-first code to remove a row:
function removerow(r){
  // * Start at row and swap pointers
  for( var rr=r ; rr>1 ; rr-- ){
    board[rr]=board[rr-1];
  }
  // * Generate a new row
  board[0]=new Array;
  for( var cc=0 ; cc<boardwidth ; cc++ ){
    board[0][cc]=BLANKCHAR;
  }
}
In the second example, we shift each row down by simply re-pointing to the previous row. MUCH more efficient.
Part II – Representing The Game Board
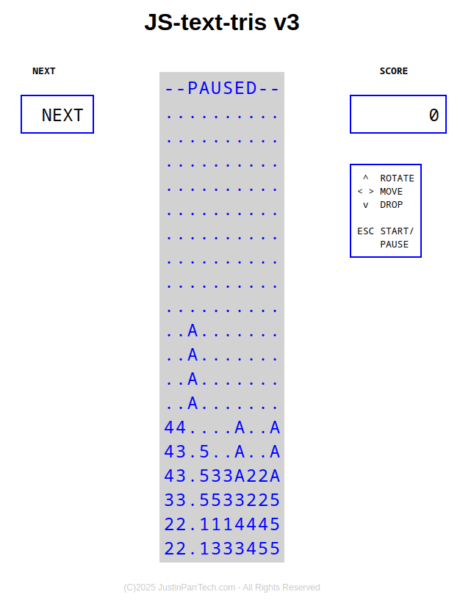
I wanted a retro look, and since this is a predecessor for other text-based endeavors, I decided to use a specially-formatted <PRE> element.
<PRE> is pre-formatted text, using a monospace font, which is perfect for representing a grid of text.
We can define the board as a single <PRE> element, then set the content using the innerHTML property.
This can be dressed up with CSS to set colors and character spacing.
To render the board, we traverse the ‘board’ array from top to bottom, then set the innerHTML property. Since <PRE> honors line breaks, we use ‘\n’ after each row.
var tetris=document.getElmentById("tetris");
var frame="";
for( var y=0 ; y<boardheight ; y++ ) {
  for ( var x=0 ; x<boardwidth ; x++ )
    frame+=board[x][y];
  frame+='\n';
}
tetris.innerHTML=frame;
So far, so good.
Phase III – Tetrominoes
There are 7 discreet tetrominoes, and each one can have one of up to 4 rotations.
I needed a fairly efficient way to represent all of this, which starts by devising a way to encode a single tetromino.
There are always 4 tiles (“tet” means 4), so each can be represented by a seed location, and a list of offsets for the other 3 tiles:
//  X0
// 12
var tet=new Array;
tet[0]={ xi:  1 , yi: 0 };
tet[1]={ xi: -1 , yi: 1 };
tet[2]={ xi:  0 , yi: 1 };
In the example above, “X” is the seed location, and then each tile has an offset from the seed.
To draw the piece at a specific position (x,y) we simply traverse the array:
var c='X';
board[x][y]=c;
for( var i=0 ; i<tet.length ; i++ ){
  board[x+tet[i].xi][y+tet[i].yi]=c;
}
We can simply expand this strategy to include all pieces by using an extra dimension.
To account for rotation, although this can be accomplished using a transformation matrix, it’s simply faster and much less complicated to pre-render each rotation for each piece, especially since many of the pieces have symmetries. We can add rotation as another dimension, so the final structure looks like this:
tets[t][r][n]

t = which tetromino (0-7)
r = rotation (0-3) * 90 degrees
n = node list (0-2)
The shape above happens to be array element 3 in my shape array, rotation 0.
var tets=new Array;
tets[3]=new Array;
tets[3][0]=new Array;
tets[3][0][0]={ xi: 1 , yi: 0 };
tets[3][0][1]={ xi: -1 , yi: 1 };
tets[3][0][2]={ xi: 0 , yi: 1 };
In fact, not every piece has 4 unique rotations due to symmetry. Only the two “L’s” and the “T” have no rotational symmetry. If we consider the “S” tile above, in fact, it only has two rotations:
           0
 X0        X2
12   and    1
Technically there are 4 discreet rotations due to the offset of the seed position, because the seed can never be in the exact center of the piece. However, having four discreet rotations doesn’t “feel” like the original Tetris:
     1    21  0
 X0  2X  0X   X2
12    0        1
Having the seed location fixed, with four discreet rotations makes the piece kind of float around as it rotates, and doesn’t feel natural at all. Therefore, having only two discreet rotations is the best solution.
However, this means that some pieces have two rotations, while others have four, and the poor block tetromino only has one:
X0
12
Having a variable number of rotations is completely supported within our data structure, but programmatically, this is very difficult to handle. A simple solution is to simply add dummy rotations to the data structure, and being pointer-based, javascript gives us a very simple way to do this:
tets[3][2]=tets[3][0];
tets[3][3]=tets[3][1];
Javascript doesn’t COPY the objects in [3][0] and [3][1], it creates a reference to them.
Now, I had a simple, global data structure with all piece / rotation combinations encoded as a set of 3 tiles each, which are offset from a given (x,y) position.
And this is where I made my second mistake.
The first thought I had after creating the tetrominoes was that it would be nice, even though they will all be rendered as text, to have each one utilize a unique character. For example:
 33      11
33   vs   11
Since this is the same regardless of rotation, I just need a place where I can store the character used by each piece.
And, for reasons that will become relevant later, I also need to calculate bounding boxes for each combination of piece and rotation.
Unfortunately, I have nowhere to store any of this in the structure above. There are kludgy work-arounds like having fixed array locations, but that breaks the simplicity of simply being able to enumerate the arrays. So the lesson here is that I should have made the entire structure an array of objects rather than an array. For example:
var tets=new Array;
tets[3]={ drawchar: '3' , rot: new Array }
tets[3].rot[0]={ tiles: new Array , bx1:0 , bx2:0, by1:0 , by2:0 };
tets[3].rot[0].tiles[0]={ xi: 1 , yi: 0 };
tets[3].rot[0].tiles[1]={ xi: -1 , yi: 1 };
tets[3].rot[0].tiles[2]={ xi: 0 , yi: 1 };
Rather than go back and change the data structure, plus all associated code, I elected to create a separate data structure for the metadata:
var tetdata=new Array;
tetdata[3]={ drawchar: '3' , rot: new Array }
tetdata[3].rot[0]={ bx1:0 , bx2:0 , by1:0 , by2:0 }
Although this is kind of kludgy, it’s better than going back and starting from scratch. Plus, this “preserves” the static shape data separate from the metadata which is mostly calculated upon initial execution.
Phase IV – Bounding Boxes
For multiple reasons that will become clear later, we need a bounding box for each piece, and actually, the bounding box for most pieces changes with rotation, so we need a bounding box for each combination.
In our game board, x goes from left to right, and y goes from top to bottom:
0 <= x < width
0 <= y < height
Although we intend to pick x locations randomly when new pieces are generated, they all start at row 0 (top). If we spawn in an “S” piece, it might look like this:
  |0123456789
-------------
0 |....X3....
1 |...33.....
2 |..........
However if we consider the cases of x=0 for rotations 0/2, or x=5 for rotations 1/3, we quickly see that there is a problem:
  |0123456789
--------3----
0 |X3...X3...
1 33.....3...
2 |..........
In the first case, the “seed” is drawn at (0,0) but the tail of the “S” exceeds the left-hand edge of the board (-1,1). Likewise, in the second case, the piece is rotated and part of the “S” exceeds the ceiling (5,-1). We have the same problem for the right-hand edge and the bottom.
This can occur if we spawn a new piece, but also if the user moves or rotates the piece such that some of the tiles fall outside of the game board.
Although most tetrominoes have a 2×3 bounding box, the “bar” (1×4) and “block” (2×2) do not. In addition, the seed location may not be consistent within the bounding box.
So the easiest approach is to calculate each bounding box dynamically. This is a brute-force process, but since it’s only done once at load time, that’s OK. Pre-calculating the bounding boxes means that we have less work to do as the game is actually running. Since the piece’s actual location will change, we need a relative bounding box, where the seed tile is assumed to be at (x,y) and the boundaries would be (x+x1 , y+y1) – (x+x2 , y+y2), where (x1,y1) is an offset above and to the left of the seed, and (x2,y2) is below and to the right of the seed.
var x1=0 , y1=0;  //upper-left bound (negative offset)
var x2=0 , y2=0;  //lower-right bound (positive offset)

var tet=tets[t][r];  //pointer to piece t, rotation r

for( var i=0 ; i<tet.length ; i++){
  if(tt[i].xi<x1) x1=tt[i].xi;
  if(tt[i].yi<y1) y1=tt[i].yi;
  if(tt[i].xi>x2) x2=tt[i].xi;
  if(tt[i].yi>y2) y2=tt[i].yi;
}
tetdata[t].rot[r]={x1:x1 , y1:y1 , x2:x2 , y2:y2};
Now, we can use the piece’s bounding box to keep the piece within the game board at all times.
 lb   x1 x2    rb
 |     | |     |
 |      X3     |
 |     33      |
We can accomplish this with a simple clamping function that returns an offset:
function normalize( n1 , n2 , lb , rb ){
  var ret=0;
  if(n1<lb) ret=lb-n1;
  if(n2>rb) ret=rb-n2;
  return(ret);
}
This function returns an offset to x or y that would bring the piece’s bounding box within the boundaries of the game board.
- If x1>=lb (which is 0) and x2<=rb (board width-1), then no offset is necessary.
- If x1<lb (which is 0) then the offset is 0-x1, and x1 is negative, so the response is a positive offset. For example, if x1=-1 then 0- (-1)=1, which means that the piece needs to be shifted one tile to the right in order to fit within the game board.
- If x2>rb (which is width-1) then the offset is (width-1)-x2, and x2 is positive, so the response is a negative offset. For example, if x2=10 and width-1=9 then 9-10=-1, which means that the piece needs to be shifted one tile to the left to fit within the game board.
The same function can be used for clamping both x and y. For a new piece, x will be random (0-9) and y=0 (always starts at the top of the board):
// t = tetromino
// r = rotation
// x = proposed x location
// y = proposed y location

var td=tetdata[t].rot[r]  //pointer to bound box
x+=normalize( x+td.x1 , x+td.x2 , 0 , boardwidth-1 );
y+=normalize( y+td.y1 , y+td.y2 , 0 , boardheight-1 );
For example, in our first case of x=0, y=0 and rotation=0 (above), x will be shifted to 1, while y will remain unchanged (piece location is 1,0).
In the second case, where x=5, y=0 and rotation=1 (above), x will remain unchanged, but y will be shifted to 1 (piece location is 5,1).
Beyond spawning a new piece, we will use the same logic for moves and rotations, which prevents the user from moving the piece outside the game board. Likewise, if the user moves a piece to the edge of the board and rotates it, the piece will be further shifted in order to accommodate the new orientation.
Phase V – The Game Loop
Now, it was time to make the game actually DO STUFF, and in most games, we call this “the game loop”:
- Draw the game board
- Check for user input
- Update player positions
- Update the game state
- Repeat
On retro platforms, the game runs at the speed of the hardware. In other words, once the game completes a full loop, it immediately starts the next loop.
However, this is only reasonable if the hardware is constant – for example, arcade games and home game consoles that have a well-defined set of specifications.
In the PC world, even in the DOS era, hardware can vary, and the impact is that the game might run faster or slower on different hardware, which can be understated as undesirable.
Since javascript runs in the browser, and the speed of the browser is tied to the hardware, running the game loop at full speed simply isn’t an option. Either the game will run much too quickly, or it will bog down the operating system.
So, we need a way to regulate the game loop.
The worst way to do this is to build up a delay by performing expensive computations, where each computation takes a fixed amount of time. For example, checking to see if a large number is prime might take 10 milliseconds, and doing this 30 times would produce a 300 millisecond delay. However, this burns unneeded CPU cycles, and again, the amount of delay is subjective based on the hardware speed.
Some languages implement a sleep() function, where you can sleep(milliseconds) before resuming your game loop. However, if the sleep duration is too small, you burn unnecessary CPU cycles. If the sleep duration is too high, user input is checked infrequently, making the game seem sluggish.
Therefore, the second way to address regulating the game loop is to use the system clock. Let’s say we want to wait 300 milliseconds, we would read the system clock, calculate a future time to resume (300 milliseconds later). Then we enter a loop, sleep for a few cycles, check for user input, and then check the system time until it meets or exceeds the resume time. This allows the game to be responsive by checking user input during the sleep cycle, but still burns unnecessary CPU cycles. And, javascript doesn’t implement a sleep() function.
The best way to regulate the game loop, especially in javascript, is to have the entire game loop event-driven.
- Use key events to capture user input regardless of game state
- Use timer events to drive the game loop
First, let’s look at the timers. Rather than configure multiple timers that might conflict, we can set a timer “tick” callback based on the minimum timer value, then simply loop through an array in order to trigger whatever game events we want. This also gives us a convenient way to toggle which events are active without juggling multiple actual timers. For example, if we pause the game, we can simply disable the row timer, while other timers continue running if needed.
//*** Set up game timers ***
timers=new Array;
timers[ROWTIMER] = { active: false , tick: 0 , reset: 10 , callback: rowtimer };
timers[EFFECTSTIMER] = { active: false , tick: 0 , reset: 1 , callback: effectstimer };
setInterval(tick , 100);

function tick() {
  //disable keyboard events
  keyevents=false;

  //console.log("tick");
  for(var i=0 ; i<timers.length ; i++ ) {
    if(timers[i].active) {
      if( (timers[i].tick--)<=0 ) {
        timers[i].tick=timers[i].reset;
        timers[i].callback();
      }
    }
  }

  //enable keyboard events
  keyevents=true;
}
When the javascript timer fires, it calls the tick() function, which does the following:
- Clears a flag to disable keyboard events, so that we avoid pre-emption
- Loops through the array of timer events defined.
- If the tick counter of any given timer event reaches 0, it calls that event’s callback function. There are two events defined…
- The ROWTIMER event is responsible for moving an active piece toward the bottom of the game board. This event fires every 10 calls, and each call is 100ms, so the row event fires 1 time per second.
- The EFFECTSTIMER event is responsible for visual effects. Currently, this is just the row removal effect. This event fires every 1 calls, which is every 100ms.
- Sets a flag to re-enable keyboard events.
The last part of our game loop is to capture user input. For this, we the keydown event in javascript.
//*** Key listener ***
document.addEventListener('keydown', function(event) { keypress(event); });

function keypress(event) {
  if(keyevents==false)
    return;

  //disable pre-emption
  keyevents=false;

  if(event.key=="ArrowLeft"){
... more code etc ...
  }

  keyevents=true;
}
We create a listener for the “keydown” event, which calls the keypress() function when fired.
In the keypress function, the first thing we do is check to see if keypress flag is set, and immediately return if not, thus disabling keyboard events when needed.
At the end, we re-enable the keypress flag.
At this point, we have a functioning game loop.
Phase VI – Row Event and Redrawing the Board
The “row” event calls rowtimer(), which does most of the heavy lifting:
- If there is no active piece, it creates one at the top of the board
- It lowers the active piece to the next row
- It checks to see if the active piece hit the floor (taking in to account the piece’s bounding box)
- It checks to see if the active piece has collided with another piece
- If the piece can’t be lowered, it memorializes the piece to the game board (explained below)
- It checks to see (using the piece’s bounding box) if row 0 is occupied, thus triggering game over
I used globals to store details of the active piece and next piece:
var activepiece={ active:false , x:0 , y:0 , tet:0 , rot:0 };
var nextpiece={ tet:0 , rot:0 }
“nextpiece” is generated once during game initialization, and the first active piece is generated from nextpiece during the first row event.
//Copy tet/rot from nextpiece
var t=nextpiece.tet;
var r=nextpiece.rot;

//Generate new nextpiece
nextpiece.tet=Math.floor(Math.random()*tets.length);
nextpiece.rot=Math.floor(Math.random()*tets[t].length);

//Random x ; y=-1 because it will immediately be incremented
var x=Math.floor(Math.random()*bwidth);
var y=-1;

//Pointer to shape metadata
var tt=tetdata[t].rot[r];

//Adjust position for bounding box
x+=normalize( x+tt.lx , x+tt.mx , 0 , bright );
y+=normalize( y+tt.ly , y+tt.my , -1 , bfloor );

//Assign values to activepiece
activepiece.active=true;
activepiece.tet=t;
activepiece.rot=r;
activepiece.x=x;
activepiece.y=y;
Some Tetris variants display a queue of up to 5 upcoming pieces. If I choose to implement this later, I can simply convert nextpiece to an array and use a tail pointer to implement a circular queue.
Note that the RNG is bounded by the array sizes. This keeps all of the code modular. If I decided later to implement “tritris” or “pentris” later, the RNG bounds automatically adjust.
Advancing to the next row is not as striaghtforward as it seems. Mechanically, all we do is add 1 to the activepiece’s y coord. However:
- The new y coordinate might put the piece partially below the floor boundary
- The new y coordinate might result in a collision between the active piece and other occupied tiles on the game board
So the best approach is to speculate, do all of the checking, then commit if there are no collisions or boundary issues.
First, we need a function that detects a collision, because we can re-use this later when we write the code for movement and rotation.
function collision(nx , ny , nr){
  var ret=false

  if(board[nx][ny] != BLANKCHAR) {
    ret=true;
  }

  var tt=tets[activepiece.tet][nr];
  for( var i=0 ; i<tt.length ; i++ ){
    if(board[nx+tt[i].xi][ny+tt[i].yi] != BLANKCHAR) {
      ret=true;
    }
  }

  return(ret);
}
We start by assuming no collision (ret=false). First, we check the seed location (nx,ny). Then, we loop through the tile data for the current tetromino, checking the board location for each. Remember that I mentioned we can use this same function later for moving and rotating pieces, this involves speculating on the piece’s rotation, which is why we don’t assume the rotation from activepiece.
If a collision is detected, the function returns true.
if( (ny+tetdata[activepiece.tet].rot[activepiece.rot].my) > bfloor) {
  // * piece hit floor
  activepiece.active=false;
} else {
  // * check for piece collision
  if(collision(nx,ny,activepiece.rot))
    activepiece.active=false;
}
If the active piece made it past all of that, it’s still active, and therefore we can update the position.
if( activepiece.active==true ){
  activepiece.x=nx;
  activepiece.y=ny;
} else {
... other stuff ...
}
If the piece “died” by hitting the floor or landing on top of another piece, then we memorialize it by copying the piece to the game board as static tiles
//pointer to shape data
var tt=tets[activepiece.tet][activepiece.rot];

//char
var c=tetdata[activepiece.tet].c;

//use the old x,y coords
var x=activepiece.x;
var y=activepiece.y;

//set the seed location to char
board[x][y]=c;

//set the other tiles to char
for (var i=0 ; i<tt.length ; i++ )
  board[x+tt[i].xi][y+tt[i].yi]=c;
Last, we check for completed rows. Once again, we can use the piece’s bounding box to determine which rows to check, rather than check the entire board by brute force.
//global
killrows=new Array;

//pointer to metadata
var td=tetdata[activepiece.tet].rot[activepiece.rot];

// * scan rows from piece min row to piece max row
for( var r=y+td.ly ; r<=(y+td.my) ; r++ ){
  var cc=0;
  for( var c=0 ; c<bwidth ; c++ ){
    if(board[c][r]!=BLANKCHAR){
      cc++;
    }
  }

  // * build a list of rows to kill
  if(cc>bright){
    killrows[killrows.length]=r;
    score+=POINTS;
  }
}
Originally, the row removal logic was built in here. However, I wanted to do some lightweight text animation when a row is removed. Rather than removing the rows directly, it stuffs a list in to a global, then activates the effects timer (more details later).
After the effects animation finishes, it calls a row removal function:
function removerow(r){
  for(var rr=r ; rr>0 ; rr--){
    var or=rr-1;
    for(var cc=0 ; cc<bwidth ; cc++){
      board[cc][rr]=board[cc][or];
    }
  }
  for(var cc=0 ; cc<bwidth ; cc++){
    board[cc][0]=BLANKCHAR;
  }
}
The details of this were covered above (Phase I), so I won’t go in to great detail.
The final task of the row event is to redraw the board.
Again, we’ve already covered the details of how to render the board (Phase I), so I won’t go in to great detail.
The complexity comes in to play because the active piece isn’t actually ON the game board. Therefore we need a way to composite the two.
- I briefly considered creating a sprite plane, where the active piece gets rendered to the sprite plane, then the sprite plane and the board get composited. The problem is that each frame must start with an empty sprite plane, meaning, we would have to re-create an entire empty array (array of blanks, to be more accurate) every time we render a frame.
- I then considered copying the live game board, then compositing the active piece, but this requires two complete loops through the game board – one to composite, one to render
- So I settled on drawing the active piece on the board, rendering the board, then “undrawing” the active piece.
At first, this seems insane, but it’s actually very old school, and computationally inexpensive. PC DOS games have no sprite support, so a common technique used back then to simulate sprites was to draw a portion of the background on top of the player to “erase” them, then redraw the player in the new location.
Phase VII – Movement
In Phase V, we set up a key event listener as part of the game loop, so now let’s figure out what to do with it.
We need to do two specific things, in order to plan ahead.
First, let’s figure out how rotation works.
When I set up the arrays, I set it up so that each rotation is +90 degrees (clockwise) of the previous rotation. So if we start with rot=0, rot+=1 results in a 90 degree clockwise rotation.
There are 4 rotations for each piece, so we can use the modulus function (%) to ensure that when we rotate, we cycle through 0->1->2->3 and then return to 0.
//Clockwise Rotation
nr = (r + 1) % 4;
Although not implemented, we also need a way to turn counter-clockwise, in case we ever want to implement it. In mod 4, adding 3 is the same as subtracting 1.
//Counterclockwise rotation
nr = (r + 3) % 4;
// (0 + 3) % 4 = 3 % 4 = 3
// (3 + 3) % 4 = 6 % 4 = 2
// (2 + 3) % 4 = 5 % 4 = 1
// (1 + 3) % 4 = 4 % 4 = 0
To facilitate this, we can set up constants:
const TURNCW=1;     //clockwise
const TURNCCW=3;    //counterclockwise

nr=(r + TURNCW)%4;  //turn clockwise
nr=(r + TURNCCW)%4; //turn counterclockwise
Next, we need a generic movement handler function.
In order to clarify that, let’s define movement as a function of our user controls.
| Key | Effect | xi , yi , ri |
|---|---|---|
| ArrowLeft | Move Left | -1 , 0 , 0 |
| ArrowRight | Move Right | 1 , 0 , 0 |
| ArrowUp | Rotate CW | 0 , 0 , TURNCW |
| ArrowDown | Move Down | 0 , 1 , 0 |
| Escape | Start / Pause / Unpause | (n/a) |
Again, we haven’t implemented a CCW rotation key, but we COULD.
Given these inputs, we need a function that will attempt to move the piece as directed, taking in to account bounds checking and tile collisions.
function moverot(xi , yi , ri){
  var ret=true;  //Assume move was successful

  // Generate new x,y and rotation
  var nx=activepiece.x+xi;
  var ny=activepiece.y+yi;
  var t=activepiece.tet;
  var nr=(activepiece.rot + ri)%tets[t].length;

  // Pointer to shape metadata
  var tt=tetdata[t].rot[nr];

  // Adjust position based on bounding box
  nx+=normalize( nx+tt.lx , nx+tt.mx , 0 , bright);
  ny+=normalize( ny+tt.ly , ny+tt.my , 0 , bfloor);

  // Check new position/rotation for collision with
  //   existing board tiles
  if( collision( (nx) , (ny) , (nr) ) ){

    // Other than pushing the down key, see if there is
    //   a reasonable way to accomodate the new location
    //   and rotation.
    // First, try to move 1 square left
    // Then, try to move 1 square right
    // If none of that works, ultimately fail
    if( yi==0 ){
      // Attempt to move left, re-normalize, and
      //   re-check for collision
      nx-=1;
      nx+=normalize2( nx+tt.lx , nx+tt.my , 0 , bright);

      if( collision( nx , ny , nr) ){

        // Attempt to move right, re-normalize
        //   and re-check for collision
        nx+=2;
        nx+=normalize2( nx+tt.lx , nx+tt.ny , 0 , bright);

        if( collision( nx , ny , nr ) )
          // At this point, the user request
          //   can't be accomodated and
          //   will be disallowed
          ret=false;
        }
    } else {
      // If the user requested downward movement
      //   and there was a collision, disallow it
      ret=false;
    }
  }

  // Update activepiece if the move is valid
  if(ret){
    activepiece.x=nx;
    activepiece.y=ny;
    activepiece.rot=nr;
  }

  // Tell the caller what happened
  return(ret);
}
This function attempts to accommodate the user request to move the piece.
For example, if you are rotating a piece near the edge of the game board, we use the clamping function to adjust its location to comply with the game board boundary.
Also, as long as you aren’t moving downward, it will check one space to the left and right to see if those are valid positions. For example, if you rotate a piece next to a mountain of other pieces, this will attempt to automatically create space for it. This “try harder” approach makes the game feel much more natural to play.
However, if moving downward, we do NOT want this logic, we simply want to fail the user request. If we don’t handle it this way, the piece can get “kicked off” of a narrow ledge, which can be quite frustrating.
Finally, if we can’t accommodate the user’s request, we simply fail.
If we WERE able to accommodate, then activepiece gets updated with the final position and rotation.
Now, for the “key” event, we can use an “if” tree to select valid keys, and translate those in to a user request to move the piece using the moverot() function.
if(event.key=="ArrowLeft")
  update=moverot( -1 , 0 , 0 )  //Move left
... ... ...
if(update)
  drawboard();
The final step is to use the function’s return value to determine if the game board needs to be updated.
Likewise, pressing Escape pauses the game by turning off the row timer event, but does NOT require an update to the game board.
Phase VIII – Finishing Touches
At this point, although I had a working Tetris clone, it was missing a few amenities
Game State – Start / Pause / Restart
As I was coding, it was initially designed so that the game starts upon page load. However, this isn’t very convenient.
Early on, I coded a pause function:
function pause()
  if(timers[ROWTIMER].active){
    //pause
    timers[ROWTIMER].active=false;
    var p="--PAUSED--";
    tetris.innerHTML=p+tetris.innerHTML.substring(p.length);
  } else {
    //unpause
    timers[ROWTIMER].active=true;
    drawboard();
  }
}
If the row timer is active, it sets it inactive, then puts a banner across the top of the game board. If the row timer is INactive, it re-activates the row timer, and redraws the board.
Initially, even after the game ends, the user could press Escape and resume the game.
Using a “gameactive” flag variable, I check to see if the game is active. If so, Escape calls the pause function. If not, then the game re-initializes (game restart).
However, I quickly found out that some of the initialization code should NOT be re-executed when the game restarts – things like creating event listeners, and configuring the timers.
And, there are some blocks of code that, although they CAN execute more than once, doing so is inefficient, such as setting up the tetromino data and metadata arrays.
I avoid this with an initonce flag. Initially set to true, this allows an if block within init to execute, which sets the flag to false, and then it’s never touched again :-)
var initonce=true;
... later ...

function init(){
...
  if(initonce){
    initonce=false;

    //configure timers and other stuff
  }
...
}
And, rather than starting the game upon page load, we can load the game in an inactive state, and wait for the player to start it.
Now, when Escape is pressed, there is a logic tree to determine what happens:
| Row Timer Active? | Game Active? | Result |
|---|---|---|
| True | True | (Pause)
Set row timer=false |
| False | True | (Unpause)
Set row timer=true |
| True | False | (undefined state) |
| False | False | Restart game
init() |
As a convenience, I implemented “auto pause” which pauses an active game if the user clicks away from the window.
window.addEventListener('blur', function(event) { if(gameactive && timers[ROWTIMER].active) pause(); });
Layout, Scoring and Instructions
The first obvious thing that was missing is instructions. Nothing fancy, just a quick blurb to describe the user controls. At first I envisioned having this as a static HTML element, but formatting the text was actually much easier in javascript. So the instructions start as an empty <PRE> element that gets populated during the first game initialization.
Scoring is easy… we define a global called “score” and a constant called POINTS. When we complete a row, we add points to score.
const POINTS=10;
var score=0;

... later ...

//*** somewhere inside of row removal process ***
score += POINTS;
In the drawboard() function,we simply update the innerHTML property of the “score” element.
... during init ...
var hscore=document.getElementById("score");

... during drawboard ...
hscore.innerHTML=score;
This is a very simple scoring model, and I may make it closer to the real Tetris later, but for now, you ONLY get points for completing rows. Here are some possible options that can be mixed and matched:
| Scoring Model | Code | Effect |
|---|---|---|
| Piece lands |
if(!activepiece.active) score+=1; |
Add 1 point every time a piece lands |
| Exponential bonus for concurrency.
This gives the nice “wow” bonus for landing 4 rows using a vertical bar. |
score+=( 2 ** killrows.length ) * POINTS |
1 row = 2^1 * 10 = 20 2 rows = 2^2 * 10 = 40 3 rows = 2^3 * 10 = 80 4 rows = 2^4 * 10 = 160 |
| Points per row |
// ... somewhere in row event ... score+=1 |
Add 1 point every time the piece drops down a row |
With these additional elements (score and instructions) we run in to the typical crap that is HTML automatic layout, where controlling line breaks is a wish and a prayer. At first, my instructions were showing up underneath the game board unless using absolute positioning, which is way too static. If someone shrinks the window or uses this on a small display, it should just work without having to jump through CSS hoops to get there.
Ultimately, the easiest way to format a page with relatively static elements is to use a table.
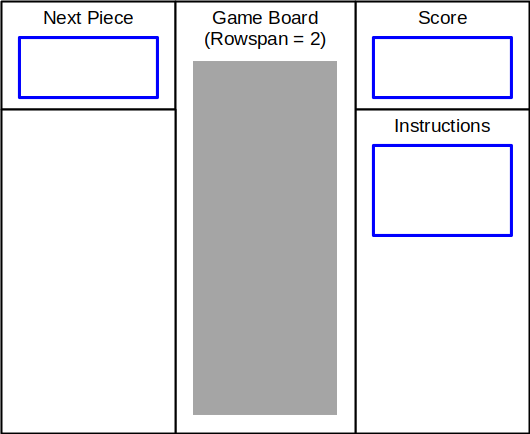
It’s old school, but it always works, and it’s always consistent. So I did a virtual 3×2 layout, with a rowspan in the center column for the game board, the score on the upper-right, and the instructions on the lower-right, but with top vertical alignment.
Next Piece
The next thing to tackle is displaying the NEXT piece.
Since this version of the game picks a random tetromino AND a random starting rotation, it would be nice to show that to the player. This involves rendering the tetromino, in its proper rotation within a properly-bounded minimal rectangle.
As we discussed in Phase IV, bounding boxes for every combination of tetromino and rotation can vary in shape and size.
There are a couple of different ways we could approach this.
- Render to an array. Since any piece will fit inside a 4×4 box, we could render the piece to a 4×4 array (a mini game board), then remove the blank rows and columns. This is a lot of work, requiring at least 3 complete passes through the array.
- Render to an array that is dynamically expanded as needed. Again, this is a lot of work. Every time we add a row or column, we have to touch an array of arrays, THEN make a final pass to render the piece.
- Strings. Although strings are wasteful in javascript, the code is simple.
I opted for strings, especially since this code ONLY gets called when a piece dies, thus very infrequently.
We can start by calculating starting positions, bounding boxes, width, and height.
// t = tetromino
// r = rotation
// bounding box is (x1,y1)-(x2,y2)
td=tetdata[t].rot[r];  //pointer to metadata
tt=tets[t][r];         //pointer to shape data
x=0-tt.x1;
y=0-tt.y1;
w=x+1+tt.x2;           //width
h=y+1+tt.y2;           //height
ch=tetdata[t].ch
For example, let’s assume we are rendering the “right-S” piece in its horizontal orientation.
 X3
33
The bounding box is (-1,0)-(1,1), so at this point:
x=1
y=0
w=3
h=2
ch='3'
Now, we can “pre-render” a tiny game board, and modify that string as needed.
out=BLANKCHAR.repeat(w)+'\n';
//...\n
out=out.repeat(h);
//...\n...\n
Frustratingly, strings are static in javascript, and there is no way to modify a string without creating a new string. So we need a function to replace a character.
function replacechar( s , c , p ){
  // s=string
  // c=char
  // p=position in string
  return( s.substring(0,p) + c + s.substring(p+1) );
}
Using this, we can walk through the normal rendering routine:
w++;  //add 1 for '\n' at the end of each line
out=replacechar( out , ch , (y * w)+x );
for( var i=0 ; i<tt.length ; i++ ){
  var nx=x + tt[i].xi;
  var ny=y + tt[i].yi;
  out=replacechar( out , ch , (ny * w)+nx );
}
Now we can update the innerHTML property of the appropriate element:
var hnext=document.getElementById("next");
... later ...
hnext.innerHTML=out;

// .33
// 33.
So, lots of string juggling, but it works. Really, javascript should allow strings to be mutable so that they can be addressed like an array (as in C);
Row Removal Effect
I wanted some fancy animation when a row is removed!
Something like this:
00...000.0
0000000000
00000.0000

00...000.0
##########
00000.0000

00...000.0
**********
00000.0000

00...000.0
..........
00000.0000

..........
00...000.0
00000.0000
- The animation spans the entire row (or rows)
- Frames progress in rapid succession
- Rows are removed at the end of the animation sequence
Fortunately, we had planned for this when we set up the game loop. We can use the effects timer event which is already in place. The row event currently handles the row removal, but that will have to be handed off to the effects handler:
Current:
Row_Event --> Row_Removal

Change to:
Row_event --> Effects_Events --> Row_Removal
Currently, the row event handler builds a list, then calls removerow() for each row. Instead, we can hand off control to the event handler by toggling timers:
timers[ROWTIMER].active=false     //disable row event handler
timers[EFFECTSTIMER].active=true  //enable the effects event handler
Now, the effects timer is driving the game loop.
To do the animation, we can start by defining our animation sequence:
effects=new Array;
effects[0]="#";
effects[1]="*";
effects[2]=".";
We need a way to track the state (animation frame):
var fxstate=0;
In the effects timer handler, we handle the actual animation:
if(fxstate<effects.length){
  //draw the current animation frame
  for( var i=0 ; i<killrows.length ; i++ ){
    var r=killrows[i];
    for( var c=0 ; c<boardwidth ; c++ ){
      board[c][r]=effects[fxstate];
    }
  }
} else {
  //remove rows after animation completes
  for( var i=0 ; i<killrows.length ; i++ ){
    removerow( killrows[i] );
  }

  //reset fxstate
  fxstate=0;

  //return control to row event handler
  timers[ROWTIMER].active=true;
  timers[EFFECTSTIMER].active=false;
}
drawboard();
- If we have frames left to draw, we update the game board with the current animation frame, then redraw the board
- If we have no more frames, we remove the rows that have been flagged for removal, and again redraw the board.
- However, we also have to reset the the animation state
- And, transfer control of the game loop back to the row event handler
…..And, we’re done!
Conclusion
If you made it this far, thank you for reading!
With about 900 lines of javascript, YOU TOO can write a pretty decent, retro Tetris clone.
Future plans:
- Graphical version
- Implement enhanced scoring, and make the row timer get faster as the game progresses (game currently plays at a constant speed)
- Color, maybe? Color would be nice, but I kind of like the monochrome, old-school text-based look.
- This was really a research project in preparation for other retro, text-based games. Specifically, I have a text-based dungeon-crawler in mind.
- Javascript is an excellent teaching language, similar to how BASIC was used in the 1980’s. I think a lot of people would disagree with this, but I have some fairly convincing arguments. I will be developing a post around this.
Comments and feedback are welcome!