My old work laptop, a HP, was a complete piece of crap. When they sent me my new laptop, as a bit of a Dell fanboy, I was excited to see that it was a Dell. However, I quickly began to question some of the design choices. After using it for a couple of weeks, I have solidly decided that the Dell Latitude 7450 Laptop…Thing is badly designed.
Good Design – Bad Design
Some things are designed well, and others aren’t. Posts in this category are meant to call out both, and in the case of bad designs, provide comparison or contrast to the same function designed properly.
Camera technology has evolved over the last couple of decades to the point where consumer-grade cameras are decent quality, but fairly inexpensive, and therefore cameras have become fairly pervasive. In general, having a camera is a good thing – it is a way to increase your awareness, and if the camera is being recorded, the camera can be a witness on your behalf. However, in certain situations, having a camera can work against you as well. We will explore several scenarios where your privacy and / or rights could be compromised, as well as technology recommendations for protecting them.
Two bad lines of code took this entire site down. Here is what you can learn from my mistake.
We all know (well, HOPEFULLY we ALL know) that investing in cryptocurrency is fraught with risk. However, with the promise of privacy and decentralized banking, doesn’t crypto do more good than bad?
In short, NO. Keep reading to find out why…
Rant: SMA vs. RP-SMA
A few years ago, I put up a wireless camera system, and I ended up needing an antenna extension cable.
I vaguely recall buying a SMA, and it was the wrong one, which of course meant that I had to buy a RP-SMA cable, which worked.
I have also occasionally had to buy RP-SMA cables to extend WiFi antennas from time to time – mainly due to line-of-sight issues.
And I never gave it much thought after that.
Having recently installed a new gate opener, I found that I needed to raise the antenna (again, due to line-of-sight issues), and I bought a RP-SMA cable, which I assumed was fairly standard.
Imagine my surprise when it didn’t work – ONE end connected just fine, but the other end wouldn’t connect at all.
“What idiot used the wrong standard?”, I thought to myself.
So I bought a SMA cable, and that worked out just fine.
However, I started thinking about it. Why have two cables that are otherwise identical, but not interoperable?
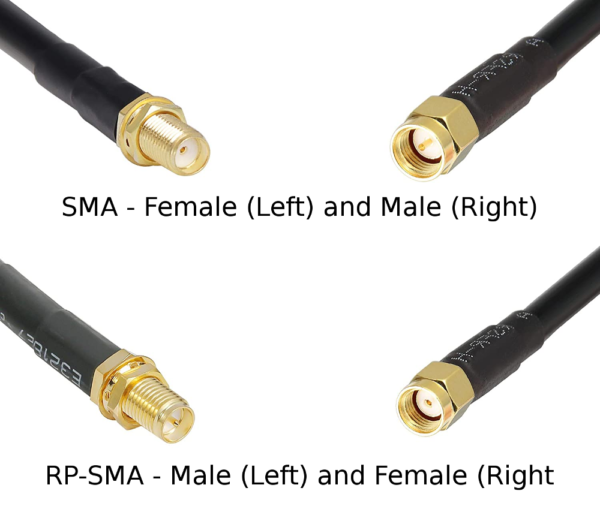
Other than the pin configuration, SMA and RP-SMA are identical. In regular SMA, the male pin goes on the female-threaded connector. In “Reverse Polarity” SMA, the male pin goes on the male-threaded connector.
What is SMA?
The SubMiniature A (SMA) connector is a smaller, lighter-weight, and more precision version of the “F” connector.
If you’ve ever had a VCR or cable box in the 1990’s, you have at least one of these in the bottom of a drawer somewhere:

The venerable “F” connector at the end of a coaxial cable was once the standard way to connect devices that share a NTSC video signal. Over time, this was replaced by newer standards, but even as late as the early 2000’s, you could go purchase a VCR, and it probably came with one of these cables.
The pin on the male end is typically the unshielded cable’s core, which protrudes from the insulation. The male end has a female thread that freely spins, while the female end has fixed male threads. To connect the two, you insert the pin in to the female end, and tighten the free-spinning “nut” on the male end. Here is an RG59 elbow that has both male and female F connectors:
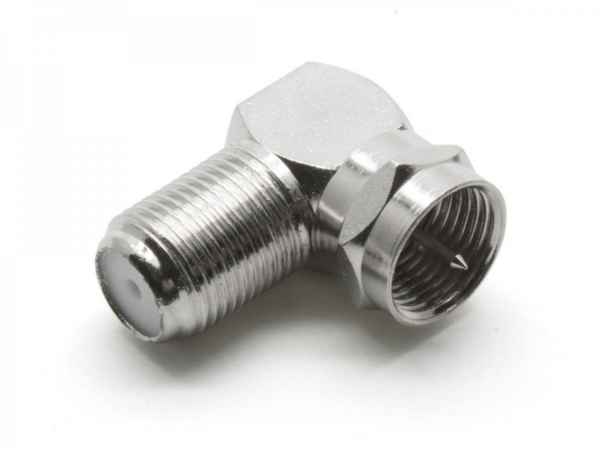
RG59 (“F” Connector) Elbow
The SMA connector is slightly smaller, lighter, and machined to more specific tolerances.
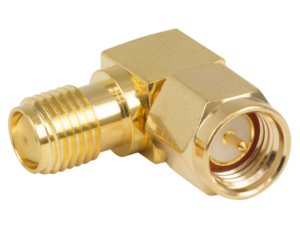
SMA Elbow
If you were unaware of the scale, SMA connectors look almost identical to F connectors. However, where the female F connector is about 1/3 inch in diameter, the female SMA connector is about 1/4 inch – about 32% smaller.
Today, SMA connectors are found almost universally in any consumer application that uses an external antenna, including hand-held radios, FRS (walkie-talkies), garage door openers, and WiFi routers.
Well, not WiFi routers.
This is where RP-SMA comes in.
What is RP-SMA?
I always assumed that one or the other supported better attenuation, or more bandwidth, or maybe one was for outdoor applications. But, that’s not the case.
“Reverse Polarity” SMA, or RP-SMA, was created as a way to appease the FCC’s requirement to keep people from being able to boost their WiFi signal by attaching a larger antenna.
I wish I was kidding.
You see, when WiFi was first standardized in 1997, the FCC required “unlicensed transmitters” to use an antenna connector that was either proprietary, or required professional installation.
In order to address the FCC requirement, some genius decided to move the pin on the then-standardized SMA connector from the female-threaded end to the male-threaded end. So RP-SMA should really be called “Reverse Gender” SMA – polarity refers to the signal, and gender refers to the connector.
As an easy fix, the larger manufacturers adopted RP-SMA as an alternative to SMA, because inventing an entirely new connector would be unavoidably complicated and unreliable.
Because all of the larger WiFi manufacturers used RP-SMA, it became fairly standard, and because it became fairly standard, parts and cables eventually made their way in to the consumer market. And once the parts and cables hit the consumer market, it was no longer considered proprietary.
So, just 3 years later in 2000, the FCC dropped the “unique and proprietary” requirement, because RP-SMA was no longer unique, and no longer proprietary. And by that time, WLAN was fairly standardized, and the government had other things to worry about.
Unfortunately, the legacy of those bad decisions is that we have two incompatible but semi-interoperable standards.
Why RP-SMA is Bad
In summary, there is too much complexity, which leads to too many possibilities for problems.
In my case, I didn’t even know that I had the wrong cable until I went to connect the two male ends together.
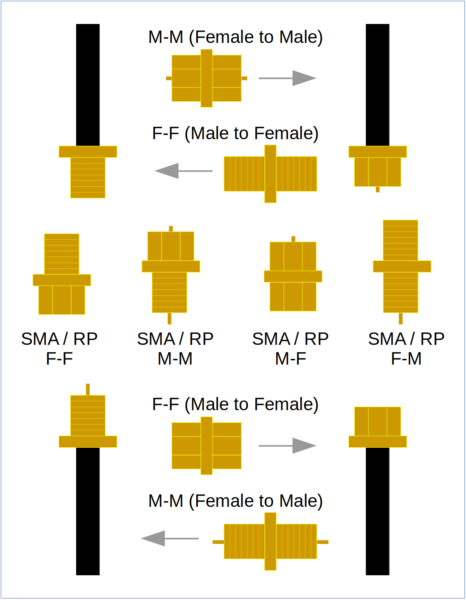
SMA is on the top, RP-SMA is on the bottom. In addition to the two gender changers for SMA and the two for RP-SMA, there are four additional converters between the two. Also, RP-F is mechanically-compatible with SMA-F, but won’t pass a signal because there is no center pin on either connector.
Because the two standards use the same mechanical connection, it’s way too easy to mistake one for the other. In addition to two gender changers for each, there are four additional converters, which means that there are eight possible combinations instead of the usual three (M-M, F-F, M-F) that you would find with any other connector.
Worse, you can connect a female RP-SMA to a female SMA, but it won’t pass a signal because there is no pin.

For example, if I didn’t know better, and simply bought a RP-F to SMA-F coupler, I could have spent weeks troubleshooting, and I bet others have done this.
It’s a bad standard, and now that the FCC no longer requires it, RP-SMA should be completely deprecated in favor of SMA, which was the original standard.
(And besides, “Reverse Polarity” SMA is not even named correctly)
How Do We Get Rid of RP-SMA?
- Stop making devices with RP-SMA connectors. Eventually all of the old devices will die off.
- Stop making RP-SMA cables. Make ONLY SMA cables, and continue to produce converters for situations where a cable needs to connect to an older RP-SMA device.
As with most pin-based connectors, devices that use either SMA or RP tend to have female connectors, because pins bend, and replacing a bent pin on a device is a lot more expensive than simply replacing a cable. Further, most antenna cables tend to be male-to-female, and antennas tend to be male. Therefore, for most applications, converting RP to SMA would only require a RP-male to SMA-female connector, and then everything after that, including the antenna, would be SMA.
It’s 2022, and buying a TV or monitor isn’t that easy… There are tons of acronyms and options, making it difficult to understand what you’re buying. Read on for some solid buying advice.
Unfortunately, these two things have absolutely no relationship to each other.
Recently, while working on a sheet metal project, I was annoyed that I had to go find a sheet metal gauge chart, because sheet metal is pretty much only sold in “gauge” thickness. I was even more annoyed to find that different metals have different gauges. So 14 gauge stainless is not the same as 14 gauge copper, and neither of these are the same as 14 gauge aluminum
Bore Gauge
Although this is an outdated system, its only modern vestige applies to shotguns.
And it goes like this:
The bore gauge number (n) is the diameter of the bore, such that n lead balls of equal diameter weigh 1 pound.
Therefore, the greater the bore gauge, the smaller the diameter.
So when is 12 > 20? When you’re talking about bore gauge.
Yep. That’s bad. But, it’s at least manageably bad. There is at least a formula.
Lead weighs about 11.8 ounces of weight per ounce of volume.
A pound of lead (16 weight ounces) would therefore occupy a mere 16 / 11.8 = 1.35 fluid ounces.
To relate volume and diameter, we have to convert fluid ounces to inches, and 1 ounce of volume = 1.8 cubic inches.
Therefore, 1.35 fluid ounces of lead = 1.35 * 1.8 = 2.43 cubic inches.
At this point we have 2.43 cubic inches of lead, which we know is enough for a “1 gauge” lead ball, but we need to find the diameter.
Volume of a sphere (V) = 4 / 3 * Pi * r^3
r = Radius
r^3 = Radius to the 3rd power (cubed)
Since we have the volume and we need the diameter, we need to rearrange this to solve for radius, then multiply by 2 (diameter = 2 * radius)
d = 2 * ( (3 * V) / (4 * Pi)) ^ 0.3333
By inverting ^3 (cubed) as ^ 0.3333 we get the cubed root
If we compute this for our 2.43 cubic inches of lead, we get:
d = 2 * ( (3 * 2.43) / (4 * Pi)) ^ 0.3333
d = 2 * ( 7.29 / 12.57 ) ^ 0.3333
d = 2 * 0.58 ^ 0.3333
d = 2 * 0.83
d = 1.667 inches
A 1 gauge bore diameter is 1.667 inches.
For the general case, we can start by computing the amount of lead. Since volume and weight are proportional, and the volume of a pound of lead is constant:
V = 2.43 / g
2.43 = 1 pound of lead in cubic inches
g = gauge number
We then take the same formula, substitute for V, and pre-compute some constants:
d = 2 * ( ( 3 * 2.43 / g ) / (4 * Pi )) ^ 0.3333
d = 2 * ( 0.58 / g ) ^ 0.3333
We can cube both sides and further simplify:
d ^ 3 = 8 * 0.58 / g
d ^ 3 = 4.64 / g
d = 1.668 / g ^ 0.3333
And, we can use this for any gauge number (g):
| Gauge | Diameter |
| 10 | d = 1.668 / 10 ^ 0.3333
d = 1.668 / 2.154 d = 0.77 inches |
| 12 | d = 1.668 / 12 ^ 0.3333
d = 1.668 / 2.289 d = 0.73 inches |
| 20 | d = 1.668 / 20 ^ 0.3333
d = 1.668 / 2.714 d = 0.61 inches |
And, you can plug any number in to this formula, so if you wanted a 14.5 gauge bore size (for whatever reason), you would use the same formula above, and that bore size is 0.68 inches.
You can even reverse the process to find the bore gauge corresponding to a given diameter measured in inches, by solving for gauge:
d = 1.668 / g ^ 0.3333
d ^ 3 = 4.64 / g
g = 4.64 / d ^ 3
A .357 magnum has a nominal bore diameter of 0.354 inches. If we plug in 0.354, we get:
g = 4.64 / 0.354 ^ 3
g = 4.64 / 0.0444
g = 104.6
So the next time you threaten someone, you can say “Don’t make me pull out my 104 gauge!”, and at least this has an obscure but discernible meaning.
How did we get stuck with this standard? Nobody really knows! However, most texts state that gauge was used even as late as 200 years ago, when there weren’t any good, universal measuring standards. If you ordered ammunition in gauge size, you were assured that it would match your gun’s bore diameter. As the rifle (gun with a rifled barrel) is a relatively new invention, measurements were much more standardized by that time, and it makes sense that rifle bore sizes (caliber) are always measured in inches or millimeters.
However, to this day, most shotguns are still smooth-bore, because shotgun cartridges have multiple, small projectiles (called pellets) that spray out in a disc formation when the cartridge is fired. Because the pellets are much smaller than the shotgun’s bore, they don’t come in to contact with the barrel enough for rifling to be effective. Although there are rifled shotguns (called slug guns) that are designed for shooting a single, solid lead shot (called a slug), these are uncommon. Therefore, it makes sense that we’ve kept the tradition of measuring a shotgun’s smooth bore size in gauge, rather than using caliber.
Fortunately, today, bore gauge is only used for shotguns, and rifle bores have become so standardized that I can go anywhere in the world and purchase ammunition for a gun of the same caliber manufactured anywhere else in the world.
Now, let’s talk about sheet metal gauge.
Sheet Metal Gauge
Here is the formula for sheet metal gauge:
There isn’t one. Consult a gauge chart.
But, it gets even better.
Sheet metal gauge is based on density, so not only do you need a gauge chart, you need a different gauge chart for each type of sheet metal.
How did we end up with this?
Sheet metal gauge size is based on wire gauge size, but not AWG, which is the American standard for wire gauge size.
Back in the early days, each vendor had their own wire gauge size, based on the number of machining steps required in order to get down to that gauge size. E.g. 10 gauge wire requires 10 steps. Eventually, all of that got standardized as the American Wire Gauge (AWG) standard.
Wire has been mass-produced much longer than sheet metal, so when sheet metal started to be mass-produced, the sheet metal manufacturers adopted the wire gauge standard (but not AWG), and each manufacturer had their own.
Over time, like AWG, sheet metal gauge sizes became standardized.
Unlike AWG which specifies a standard wire diameter independent of any other factor (e.g. 20 gauge wire is the same diameter in copper or aluminum, or steel, or whatever), sheet metal gauge is based on density, so the gauge size changes based on the specified material.
Nominally, every reference to sheet metal states that gauge size is based on “a density of 41.82 pounds per square foot”, but that’s not the case. If it was the case, you would be able to work backwards to find the gauge number. For example, going back to the way bore gauge works, if 41.82 pounds = 1 (sheet metal) gauge, then dividing that by 2 = 2 gauge, etc. But that’s not the case. 10 gauge (steel) = 0.1345 inches, and if we multiply that by 10, we get 1.35 inches. 20 gauge = 0.0359 inches, and if we multiply that by 20, we only get 0.72 inches. So there is clearly no proportionality based on weight or thickness.
If you google for a sheet metal gauge formula, you can find plenty of references that all begin with:
Sheet metal gauge size is based on 41.82 pounds per square foot. Consult your sheet metal gauge chart, and…
As it turns out, this is a formula for calculating the weight based on gauge size, not for calculating gauge size.
Why do we still use this archaic standard? Sheet metal gauge is codified by U.S. law, for tax purposes: 15 USC 206: Standard gauge for sheet and plate iron and steel.
So, because the government regulates the thickness of sheet metal for tax purposes, you have to consult a gauge chart whenever you order sheet metal.
If you have anything to do with technology, the chances are pretty good that you wasted at least part of the month of December patching, upgrading, or reconfiguring software that uses Log4J.
Now that the dust has settled, we can look at the vulnerabilities that were announced in December, what factors led to the problem, and why it should never have occurred.
Previously, I’ve written about gun-related movie myths in “Movie Myths: Guns – Part 1“, and in there, I described in detail how guns work – both automatics and revolvers.
Since that time, I’ve thought about making a state diagram that helps explain some of the common gun-related continuity errors that you regularly see in movies and TV.
The result is the diagram that you will see in this article, along with a higher-resolution PNG and PDF that you can download for free, which would make a nice wall decoration for any gun enthusiast.
Download the PDF here, or the PNG here.
Read on for more information about state diagrams and gun-related movie continuity errors…
