After 7 months of continuous issues, I think I finally beat the problems with the front gate, but the way I did it might surprise you.
Table of Contents
Recap of the Gate Saga
In 2019, we moved out to the country. There is a very large, metal gate at the front of the property, and the previous owners had installed a Mighty Mule 560 gate opener.
In the city, we weren’t allowed to completely enclose the property, so even having a gate at the driveway was a new experience, and the fact that the gate is automated quickly became a convenience we couldn’t live without.
The Mighty Mule system uses RF transmitters with a max range of about 20 feet. Although functional, the driveway is about 250 feet long, and most definitely wouldn’t work inside the house, upstairs, or anywhere in the back of the property.
Further, unless you carried a transmitter around with you, or locked the gate open, getting in and out was a hassle.
However, I noticed that I had a WiFi signal at the front gate – although only one or two bars, it would be adequate for a WiFi interface to the gate opener. At the time, Mighty Mule didn’t offer a WiFi interface. Although they do offer one now, all of the reviews seem to indicate that it’s less than reliable and less than user-friendly.
So, I set about the task of building one using a Raspberry Pi. The final product was a WiFi-based web interface that I can operate from my smart phone (or almost any device) almost anywhere inside or outside the house, and it even has a camera so that I can see who is at the front gate before I open it.
All good at this point.
With the exception of a few minor mechanical repairs to the gate opener arm’s hinges, the gate and the opener continued to work flawlessly for another 3 years, until it died in August, 2022.
After some extensive troubleshooting, I determined that the MM560’s control board had died. As the MM560 was now a much older model, replacing the control board would have cost almost as much as buying an entire new gate opener package. Further, if I had bought just the control board from a newer model, these are incompatible with the MM560’s arm.
So, somewhat reluctantly, I replaced the entire gate opener with a newer model, the MM571-TS. Although the replacement process was fairly smooth overall, there were a few challenges to overcome, and the new system came with a few caveats.
This is where six long months of continuous hassle began.
- The transmitter range problem became unfixable. Even after adding an extension, and even after replacing the factory antenna with an omni-directional. high-gain antenna, the effective range was about 10 feet. I checked all of the connections, and also made sure I was using the correct cable. Having to practically get out of the car to open or close the gate is NOT convenient.
- The new-style transmitters that came with the MM571 are useless. Although the MM571 allows you to use both the new-style transmitters (it comes with 2), or the old-style transmitters used with the MM560, the new ones have a much shorter range. Taking in to account the antenna / range problem, you had to be within about 3 feet of the antenna to use one of the new-style transmitters, which means that they are completely pointless.
- Most automatic gate openers use a concept called “stall force sensing” to determine if there is an obstacle in the way of the gate, and if so, it immediately reverses direction and then stops in order to avoid damage or injury. On the MM560, setting the stall force was accomplished via a potentiometer on the control board. It was pre-set to approximately its mid-point when we moved in, and I never had an occasion to adjust it.
I speculate that the way this works is that when the gate is under load because it has come in to contact with an object, this increases the current used by the motor inside the arm. The control board then senses the current spike, and it uses the potentiometer either as a current divider, or to adjust a comparator, and when the resulting current exceeds a certain level, the board’s software overrides the operation of the arm, returning it to a safe position.
However, on the MM571, there is no potentiometer. The stall force can only be set to one of three predefined settings, which I believe are incorrectly labeled. Rather than “1”, “2”, and “3”, they should be labeled “I glanced at the gate sternly”, “A dog barked in the distance”, and “A gentle breeze blew”. All kidding aside, if there was any more than a gentle breeze, the gate would stall out and either refuse to open or refuse to close. To raise the frustration level even further, if the stall force sensor trips, the gate REMAINS open or closed forever until triggered by the remote… which has a pathetically short range.
MORE THAN ONCE, this resulted in one of us going through the gate, and then the gate stalled out while closing, opened back up, and remained open all night. If the gate is open, the gate is pointless. Even though there is an auto-close feature, the stall force sensor disables it. - The MM571 actuates much faster than the MM560. At first, this seems like a good feature. However, to get the gate moving faster, it must accelerate faster, and greater acceleration means greater forces. I’m sure that on paper, this seemed like a good idea, but in reality, the greater forces applied to the gate just slowly damage the gate as well as the mounting points for the gate opener arm. Further, operating with greater force also means that you are more likely to trip the stall force sensor, which itself on the MM571 is already an evil thing from hell.
Over a 6 month period of time, I had to fix the mounting bracket three times, add garage door springs as dampeners, and install a padded pillar to cushion the gate itself.
When I contacted customer support, after having previously had a very good experience, I was extremely disappointed to find that a) there was no way to adjust the stall force to a reasonable level, and b) there was no way to adjust the speed at which it operates. Further, the condescending response from tech support was that I was in the small minority of customers who would even want to slow the operator arm down, implying that their product wasn’t flawed, but I as a customer just wasn’t using their product properly.
I thought about ways to slow down the motor, such as adding a resistor, but who knows whether the higher current would trip the stall force sensor. I also thought about using a PWM controller, but that might cause yet other issues.
It got to the point that the gate and its opener became one, big, unfixable problem – I was out there screwing around with it every couple of weeks, and I detest unfixable problems that just endlessly suck more and more of my time away.
Then, in mid-January, someone tried to push the gate open with the bumper of their car.
To this day, we still don’t exactly know what happened, but when my wife tried to leave that morning, the gate was ajar and refused to open. Upon further inspection, the operator arm now had a 30 degree hook in it, and obviously was incapable of completely actuating.

Well… THERE’S your problem!
After some digging, we found that, although it wasn’t caught on camera, there was a slight bumper-shaped indentation on the gate, and there was other evidence that someone tried to tamper with it. We filed a police report, but nothing ever came of it.
I un-clipped the arm from its mount, and set about replacing the arm – after all, the entire system was only 6 months old, and the technology was now current, so SURELY I can get a replacement. Sure, for almost $400 !! Let’s recap – I spent $450 on an ENTIRE new system less than 6 months ago, that came with a (useless) box, a board, an arm, and a mounting kit, but JUST the arm is $400???
It was obvious that I needed to go in a different direction. The old saying comes to mind, “the definition of insanity is repeating the same process expecting a different outcome.” It was now completely clear to me that I would have to be insane to re-invest in Mighty Mule.
Researching a Better Option
There are several options available, but many appear to be Chinese clones of American products, including one with a “touching” story about how their company was founded by an engineer named Mike who invented the gate opener because he saw his frail, elderly mother struggling with the gate every day (!). Eliminating these one by one, the top two remaining options seem to be Mighty Mule, which we know to be a poor option, or Ghost Controls.
Before buying, I spent a few weeks researching Ghost Controls, because I didn’t want to end up right back to where I started, with an intolerable solution, and quite frankly, after months on-end of messing with the gate opener, I just didn’t feel like messing with it for a while.
Both products have similar specifications and similar price points, but I wanted to make sure I could drop the new solution in – or at least to a reasonable degree. I also wanted to make sure the Ghost product wasn’t going to destroy my gate, and that replacement parts are available at a reasonable price.
My gate is about 15 feet wide, made of welded tube steel, and is probably well over 400 lbs. Although both the Mighty Mule 571 and the Ghost Controls LSM-1 have similar specifications, and despite the fact that the MM 571 is a direct replacement for the older MM 560 that I had originally, the quality of the MM 571 was severely lacking, and it was obvious that my gate was at the top end of what it was capable of handling.
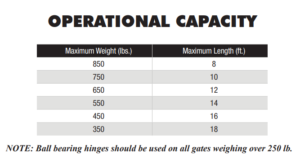
Each of these products has a weight chart. Although 15′ isn’t listed, we can average the max weights corresponding to 14′ and 16′.
| MM 560 | |
|---|---|
 |
|
| (550 + 450) / 2 = 500 lb. at 15′ | |
| MM 571 | |
 |
|
| (550 + 450) / 2 = 500 lb. at 15′
(Same as the older MM 560) |
|
| Ghost LSM-1 | |
 |
|
|
Although the MM 560 and MM 571 are rated the same, and the MM 560 never had a problem, my gate was almost too much for the MM 571 to handle because of the fast opening speed and poor quality of the arm. Despite the Ghost LSM-1 being rated 50 lb. heavier at 15′, I opted for the much heavier-duty Ghost Controls HDP-1:

(700 + 600) / 2 = 650 lb. at 15′
Here is a visual comparison of the MM 571 next to the HDP-1:
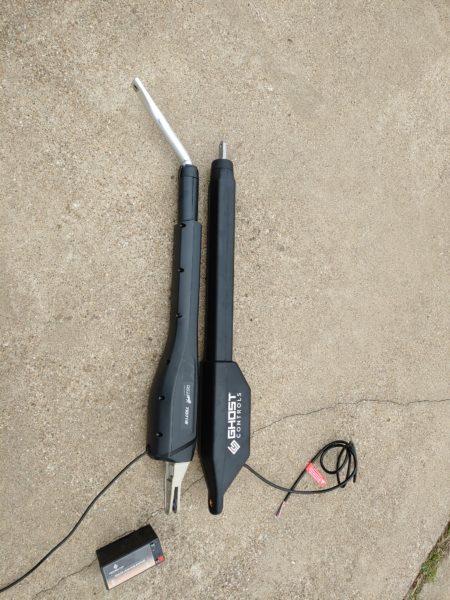
The motor casing on the Ghost HDP-1 is much larger than the MM 571. Also, like the older MM 560, the extension arm of the Ghost is made of much thicker metal than the MM 571.
Installation
There were some challenges installing the Ghost Controls HDP-1
Challenge: Mounting the Arm
When the gate was pushed in, not only did it bend the arm, it also bent the mounting bracket I had originally made for the old MM 560 on the one occasion where I had to fix it because it wasn’t originally mounted properly.

This part bolts to a piece of steel tube, which is then bolted to the gate.
Fortunately, I was able to use the MM 571 gate bracket, upside-down, to connect the Ghost HDP-1. The only thing this required was slightly over-boring the mounting holes that were already present in the square metal tube.
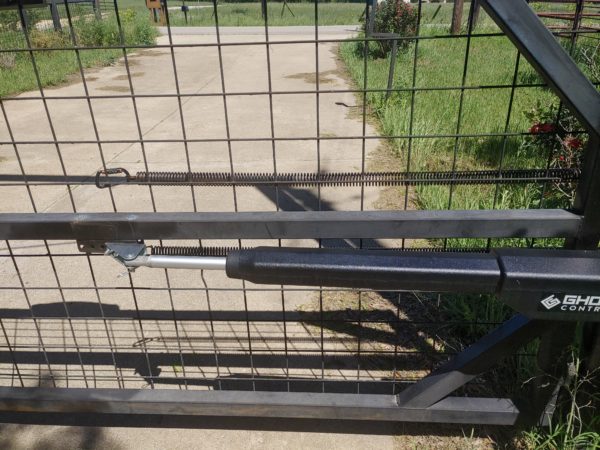
On the other end, I had to chop off the lip of the old MM mounting bracket, which someone had kindly WELDED, and then bore out the center. I spray painted it with high-temp paint.

The shoulder of the Ghost operator arm sits on top of this, and is bolted through the top.
Challenge: No Battery Box
Like the MM 571 TS (Tractor Supply model), the Ghost control box has no place to mount any batteries, and doesn’t come with an external battery box.

So, once again, rather than mess around with a separate battery box, I opted to re-re-use the MM560 control box, which has storage for two batteries. While the MM 560 and 571 could run off of one battery with an optional second, the Ghost controller requires two, even though they are wired in parallel. I suspect that I could run from a single cell, but the MM 560 box accommodates two, so that works out nicely.
When I mounted the MM 571 board in the MM 560 control box, the mounting holes in the newer control board happened to line up. But, in the case of the Ghost board, the mounting holes were much different. I took some acrylic sheet stock and built a mounting bracket that mounts to the box using the MM 5xx bolt pattern, and to the Ghost board using the Ghost board’s bolt pattern.

The 4mm holes (circled) correspond to the mounting studs inside the MM 560 control box. The 3mm holes correspond to the mounting holes on the Ghost control board.
I used a 24 TPI blade on my band saw to cut the bracket out, and drilled the holes on my drill press. I did a dry fit in the MM 560 box to ensure everything would fit properly.

Fortunately, even before I drilled any holes, I did an alignment check, to make sure everything would fit. If you look closely, you’ll notice that the entire bracket is shifted to the left slightly. This is because the original (horizontally-centered) hole placement caused the bracket to overlap the right-hand battery compartment. I simply erased the original hole marks, and shifted them to the right.
Since the Ghost control board has bottom-mounted components, I skeletonized the bracket to prevent overheating. I used a dremel to perform the inside cuts.
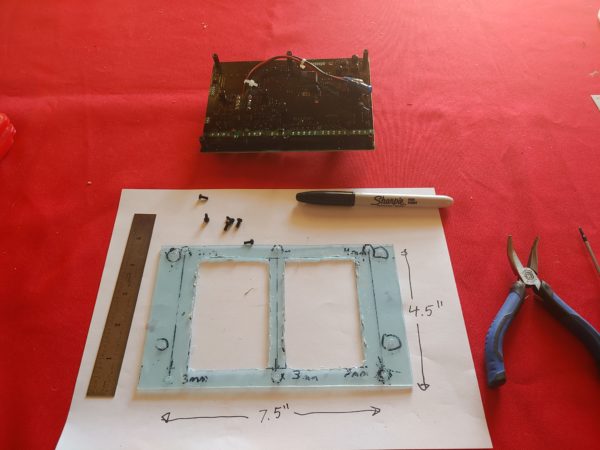
I used 2.5mm x 10mm stand-offs to mount the board to the bracket, again, because of the bottom-mounted components, and to prevent overheating.

Here is the Ghost board in its final position inside the MM 560 control box.

Because the Ghost control board has components on both sides, the distance from the top of the board to the tallest component is shorter than the original MM board, leaving enough clearance for the MM control box to close without contacting any components.
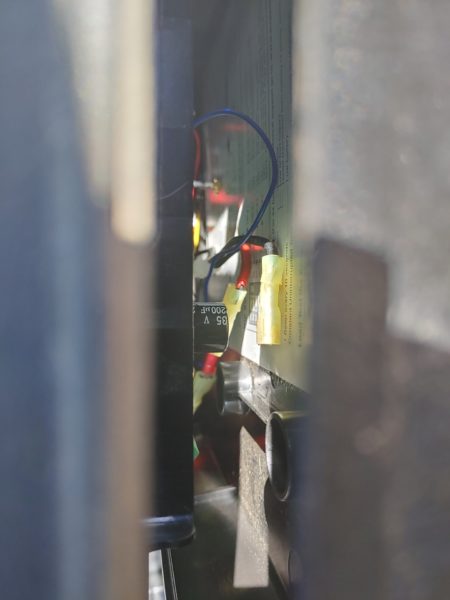
Looking through the top of the MM control box, the board is mounted on the left, and the lid attaches from the right. There is plenty of room for that capacitor, which is the tallest component on the Ghost control board.
Challenge: Migrating Other Components from the Ghost Control Box
Other than the board itself, the Ghost control box also contains a power switch, an alarm beeper, and a small antenna interface board.
The switch was a different size and shape, so I opted to keep the MM’s power switch and splice the wire and connector.

I cut the original Ghost switch off, and added female spade terminals to the Ghost’s connector.
When I mounted the 571 board in the 560 back in August, I had added male blade connectors to the power switch so that I could extend the wiring from the 571 control board. These male blades now connect to female blades on the Ghost’s power switch wire, which has the original connector.
The speaker and its connector were identical to that of the MM 560, but I opted to go ahead and install the Ghost one anyway. The component mounts inside the case, held in place with a screw-on bezel that attaches underneath.

The Ghost’s antenna connects to a small board, and the board has a cable which connects to the main control board. And, look at that! Ghost used a standard coax connector, instead of MM’s RP-SMA piece of crap.
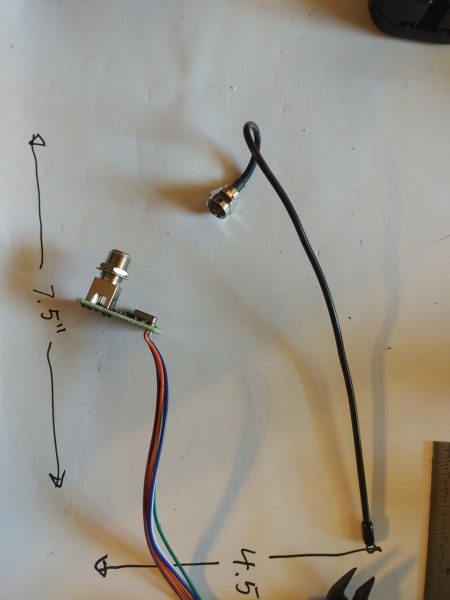
The antenna board mounts inside the case, the female coax connector protrudes through the bottom, and is affixed by the nut and lock washer.
Here is the board, mounted, with the power switch, speaker, and antenna board connected:
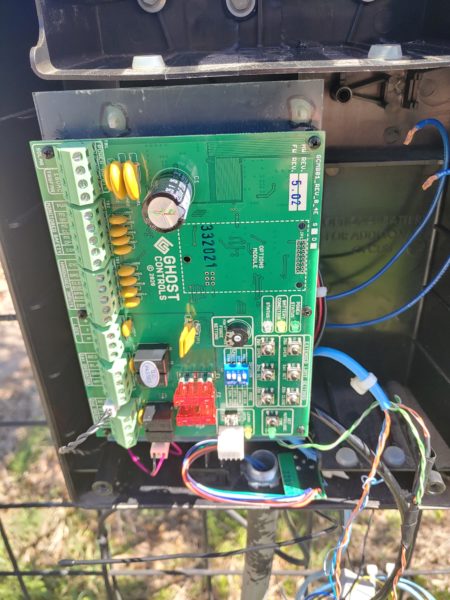
One thing I really like about the design of the Ghost’s control board is that all of the chips and other sensitive bits are bottom-mounted, which makes it much less likely for a screwdriver slip to be catastrophic. This is a nice little attention to detail, that lends to my overall opinion that the Ghost product is well-designed and well-built. It even came with a “Ghost”-branded, reversible mini screwdriver that fits the screw terminals, and also the adjustment pot for the stall force sensor!

Again, it’s not that the screwdriver is super nice nor super expensive, it’s the attention to detail. Someone thought ahead and knew that a normal household screwdriver won’t fit the narrow screw terminals.
Final Challenge: Connecting Everything
…And then, the rest…

The factory battery harness was similar to the one that came with the MM 571, but unlike MM, Ghost doesn’t threaten to void your warranty if you modify it. Since the Ghost uses two batteries, I added a second set of blade terminals. I was already using 5-position lever nuts as a poor man’s bus, so I already had an open slot for the extra pigtail.
With some testing, I got the magnetic REX (Request to EXit) sensor from the MM to work with the Ghost, but I extended the wires a little bit so that the wiring would fit more cleanly in the space between the two batteries. The sensitivity is adjustable via a pot, and I initially set the sensitivity way down, because I wasn’t sure what to expect. After a week or so, we discovered that my wife’s truck would trigger the sensor, but my son’s car would not. I set the sensitivity to about half, and haven’t had a problem since.
Connecting the arm via its dedicated cable was no problem. It attaches to the second terminal block from the bottom. The bottom terminal block is for a second arm, if you have the HDP-2, which is designed for a double-gate system. Again, a nice, thoughtful detail is that they use the same control board for both systems, so if I wanted to convert to a double-gate later, all I have to do is buy the extra arm. While the older MM-560 had connections and components for two operator arms, the MM-571 did not. Even though the MM-572 (double-arm) uses the same board, the components are simply missing from the MM-571’s control board.
Unlike the MM’s power brick that runs on DC, the Ghost’s power brick runs on AC – again, a nice little detail that makes it impossible to wire the power brick backwards. So I removed the MM power brick, and installed the Ghost’s brick inside the electrical box.
The final step was to connect the Raspberry Pi WiFi controller that I had built for the old system, and the Ghost has similar terminals to accommodate that connection. Initially, I had wired the “hold” pin on the Pi to the “cycle” pin on the board, but that was easy to fix.
At this point, I was ready to test.
And… it didn’t work.
Challenge: Troubleshooting
At first I thought the power brick wasn’t connected, but the multimeter showed the right voltage all the way to the screw terminals on the control board.
I thought that maybe the 2nd battery – originally purchased 7 years ago for my fish finder – was low or dead, but it seemed fine, although a little under-charged.
Then, I discovered that the 1st battery that had been powering the 571 was now as dead as Shia LaBeouf’s acting career.
So…funny story.
The original battery for the MM 560 was a “Mighty Mule” branded 12 volt Sealed Lead Acid (SLA) battery. When it died, I temporarily ran the 560 off of my ChromeBattery that I use for my fish finder, but Mighty Mule “strongly recommends” using only “Mighty Mule” branded batteries, which provide “longer life” and “better reliability” because they can stand up to the “intense, rigorous” use of powering the gate opener. So, I went ahead and spent about $15 more on a “Mighty Mule” branded battery.
It lasted about a year, and then died. So again, I temporarily powered the gate opener using my ChromeBattery while I bought a replacement. So the one that was in there, and was now dead, is the THIRD “Mighty Mule” branded battery! Meanwhile, the ChromeBattery was a little low, but it charged right up. As I needed TWO batteries, I went ahead and bought a two pack of the ChromeBatteries, both of which I threw on the conditioner before installing them, and they are both working just fine. So much for the “longer life” and “better reliability” of the Mighty Mule batteries!
Now, with two good batteries, the control board fired right up.
Final Configuration
The open limit is predetermined – you have to mount the arm to the gate such that it’s in the correct position when opened. The only way to adjust this is to move the attachment point.
However, you must set the closed limit, which is configurable. This is accomplished via three push buttons on the control board – a much easier process than the Mighty Mule, which requires opening and closing the gate a couple of times. Further, you can use the jog buttons to “fine tune” the gate’s closed position. If it closes too tightly, it will sense stall force and swing back open, so it needs to be snug when closed, but not tight. Because of my redneck mounting job, there is a little bit of slop, so I opted to leave the gate open by an inch or so, so that the gate won’t bang every time it’s closed.
The last thing I needed to do inside the control box was to program the transmitter. The instructions were easy to follow, and worked perfectly.
On the Mighty Mule, there were two different ways to add transmitters:
- Old-style transmitters have a bank of dip switches that can be set to one of 3 positions (HIGH, LOW, or OFF), which yields 3^9 or 19,683 possible combinations. To add a transmitter, you simply set the dip switches to one of the combinations that has already been learned by the Mighty Mule’s control board.
- New-style transmitters are digital. To add one, you MUST take the control box apart and press the “learn” button.
In contrast, the Ghost’s control board can only learn ONE transmitter code, and instead of the control board learning new transmitters, adding a transmitter is accomplished by having the new transmitter “learn” its code from an existing one. You line up the two, touching head to head, and go through a programming sequence. At first, I thought this was kind of awkward, but in reality, this means that you can add new transmitters without ever having to open the control box.
Now, let’s talk about transmitter range.
On a good day, with perfect line of sight, the transmitter range of the MM 560 was about 20 feet. The same “old-style” transmitter controlling the MM 571 is only good for about 10 feet. To my surprise, the Ghost transmitters are good for almost 200 feet! Although I can’t use it inside the house, I can walk a short distance from the car port, and it works very consistently. Sometimes, I can even get it to work underneath the car port. I could probably boost the range slightly by adding a coax extension, but it’s really not even necessary. The other nice thing is that you can click the transmitter even before you pull in to the driveway. With the 571, you had to be ALL THE WAY IN the driveway, and might have to get out of the car to get it to work.
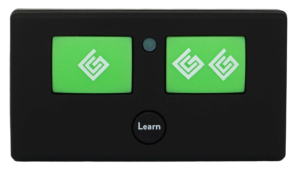
Ghost has three types of transmitters, that are all interoperable:
- The “basic” controller has two main buttons and a learn button. The two buttons operate independently – for example, if you have a second Ghost system, it can be programmed to the second button. The “learn” button allows the transmitter to learn its code from another working transmitter.
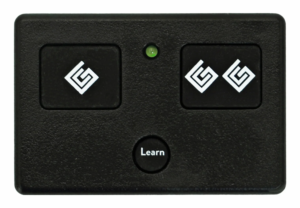
- The waterproof controller is just like the basic one, except… waterproof. This is intended for people who ride bicycles or motorcycles, and might have the transmitter mounted where it could get splashed or rained on.
- The “premium” controller has all of the buttons of the basic controller, but also has two more buttons:
- A “test” button allows you to test the gate controller – it beeps indicating readiness status – without having to open the control box.
- A “party mode” button allows you to hold the gate open until you disable it. This is intended to allow guests to come and go without operating the gate, but would also be convenient if you have someone working on your house or delivering something.

One of the really nice features of the Mighty Mule system was the keypad, which is mounted to a post outside the gate. This provides a convenient way to open the gate if you’re expecting guests (you can program guest codes) or if you forget to bring a transmitter. Inside, the keypad uses the same set of dip switches as the “old style” transmitters, so all you have to do to set the code for the keypad to one of the existing codes that the control box knows about.
Fortunately, Ghost makes an equivalent keypad, and I was able to mount it to the same post – although the screw holes didn’t line up, a drill easily fixed that, and I used some E6000 glue to waterproof the factory screw holes. Programming the keypad works just like adding a transmitter – you hold up an existing transmitter to the “programming” slot on the keypad and push a few buttons. Like the Mighty Mule, the Ghost’s keypad supports multiple codes, guest codes, and temporary codes, and even allows you to trigger “party mode” (gate held open) from the keypad. There is also a “one touch” party mode that can be activated from the keypad, which allows guests to enter without a code by pressing one button.

Once I got the keypad installed and configured, I was all set!
Final Thoughts
The original Mighty Mule 560 worked great. It was reasonably reliable, and other than poor installation (which isn’t the product’s fault) and a couple of dead batteries, we never had a problem with it.
The Mighty Mule 571, billed as a direct replacement, is of MUCH lower quality. It’s impossible to say whether this is due to acquisition, outsourcing, or the inevitable drive to maximize profit by lowering costs. It’s also impossible to tell whether the poor quality of the MM 571 is reflected in all of Mighty Mule’s currently-supported products, or if it’s just this one – presumably one of the most popular models.
I think that if I had a “normal” farm gate, which seems to be Mighty Mule’s sweet spot, I don’t think I would have had so many problems with the stall force, but there is no way to address the poor transmitter range.
So far, I’m very happy with the Ghost Controls HDP-1. The build quality is far superior, and you can see thoughtful elements in both the product’s design as well as the packaging (e.g. including a screwdriver for the screw terminals). So far, I have had no issues, other than having to increase the sensitivity of the magnetic sensor.
Hopefully, this is the END of the gate saga.
Having Two Buttons
One thing I like about the two-button transmitters is that they really represent two levels of authorization. Although having two gates is a simple example, if they are not within range of each other, you could simply use only the one transmitter code, because both controllers can independently learn the same code. However, let’s say that you have an outer and inner perimeter, and you want one group of people to be able to operate only the outer gates, and you want another group to be able to operate both.
For example, if you operate a large ranch, you probably have several perimeter fences and buildings, and you want your ranch hands to be able to come and go as needed. However, your personal residence might have a set of gates that are keyed to a second transmitter code. If someone has a transmitter with the second button programmed, they can get in and out of every gate, including those surrounding the residence. If they have a transmitter whose second button has not been programmed, they can go anywhere except the personal residence.
Another example would be to segregate “regular” and “VIP” parking. Regular folks get only the first code, while VIPs get both.
Another use case for the second button is if you have access to a second system. For example, if you have a parent or sibling who also has a Ghost gate opener – your second button can be programmed to use the other system’s code.
Although this can also be accomplished with the Mighty Mule’s new-style multi-button transmitters, this requires opening the case rather than simply having one transmitter learn the code from the other. I think Ghost’s design is clever in that regard.
Pingback: HOME | Justin A. Parr - Technologist